Showing posts with label Recipes. Show all posts

Sunday, August 17, 2014

Chocolate Mousse Cake


Happy birthday to me! Happy birthday to me! Happy birthday, dear meeeeeeee. Happy birthday to me!

For my birthday, I thought I would change things up a bit. Instead of having you give me a present, I will give you a present! Here you go:

(I picked it out myself, and I hope you like it!)

____________________

CHOCOLATE MOUSSE CAKE

CAKE:

WHAT YOU NEED:
  • 3 ounces semisweet chocolate
  • 1 1/2 cups hot, brewed coffee
  • 3 cups sugar
  • 2 1/2 cups all-purpose flour
  • 1 1/2 cups unsweetened cocoa powder
  • 2 tsp. baking soda
  • 3/4 tsp. baking powder
  • 1 1/4 tsp. salt
  • 3 eggs
  • 3/4 cup vegetable oil
  • 1 1/2 cups well-shaken buttermilk
  • 3/4 tsp. vanilla

HOW TO MAKE IT:
  1. Preheat your oven to 300. 
  2. Grease two 9 by 2 inch round cake pans. Line the bottoms of the pans with wax or parchment paper. Grease the top of the paper, and then flour the pan.
  3. Finely chop the the chocolate. Mix it in with the coffee. Let the mixture stand until the chocolate is melted and the mixture is smooth, stir occasionally.
  4. Sift the sugar, flour, cocoa powder, baking soda, baking powder and salt into a large bowl. 
  5. In your mixer bowl, beat the eggs until thickened slightly (about 3 minutes in an electric mixture). They should be lemon colored.
  6. Slowly add the oil, buttermilk, vanilla, and melted chocolate/coffee mixture to the eggs until it is just combined well.
  7. Add the dry mix and beat on medium speed until it is just combined well.
  8. Divide the batter between the pans. Bake in the middle of the oven until a tester inserted in the middle of the cake comes out clean, about an hour.
  9. Let the cake completely cool on a cooling rack.
  10. For this recipe, you only need one of the cakes. You can wrap the other cake (out of the pan) tightly and store it in the freezer for later. If you want to use both cakes, you will have to double the mousse recipe.


MOUSSE:

WHAT YOU NEED:
  • 1 tsp. unflavored gelatin
  • 1 Tbsp. cold water
  • 2 Tbsp. boiling water
  • 1/2 sugar
  • 1/4 cocoa powder
  • 1 cup whipping cream
  • 1 tsp. vanilla extract

HOW TO MAKE IT:
  1. In a cup, sprinkle the gelatin over the cold water and let it sit for one minute. 
  2. Add the boiling water and stir until all of the gelatin is completely dissolved.
  3. Mix the sugar and the cocoa together in a medium bowl. Add the whipping cream and the vanilla.
  4. Beat on medium speed until the mixture is stiff, occasionally scraping the bottom of the bowl. 
  5. Pour in the gelatin mixture that you prepared ahead of time and beat it until it is well blended.


ASSEMBLY:
  1. Invert the cooled cake onto your serving dish. 
  2. Thickly spread the mousse over the top of the cake.
  3. Optional: Drizzle melted chocolate and sprinkle chocolate chips over the deliciousness. 
  4. Enjoy!
____________________

Let them eat cake!
Katie

Tuesday, August 5, 2014

Focaccia

(Fa-cot-cha)


Focaccia is a type of bread (that we adore). We adore it so much, in fact, that it took our family three tries before we were able to take a picture of it without eating it first. True story.

The first time we made Focaccia, we were planning on making pesto-mayonnaise-tomato-basil sandwiches with them. Before any of us remembered to take a picture of it, the bread looked like this:


Is there any bread under there? If you didn't know what Focaccia was, you might have thought it was a sandwich. So, we tried again.

The second time we made it for this blog specifically. I knew I wanted to do a post on this bread, so we really tried. We really, really tried. The bread came out of the oven, and when I came back in the room the whole top of the bread was chopped off  and ready for some pesto. It was like a sad little mushroom run over by a lawn mower, ya' know? The top was gone, and it didn't look quite the same.

The third time we made it in the middle of the day. It was neither lunch or dinner time, and we succeeded!

Then we ate it. Mmm...

____________________

FOCACCIA


WHAT YOU NEED:
  • 2 cups lukewarm water (85 to 95 degrees)
  • 1 Tbsp. quick-rising dry yeast
  • 3 Tbsp. extra-virgin olive oil 
  • 1 tsp. cracked black pepper
  • 2 tsp. salt
  • 4 3/4 cups of bread flour


HOW TO MAKE IT:
  1. Mix the water and the yeast together in a large bowl. Add the olive oil, pepper, and salt. Then, stir in 1 cup of the flour until it is well incorporated.
  2. Add the flour (1/2 a cup at a time) until you form a dough ball that is soft and sticky. The dough ball does not have to be completely smooth.
  3. Move your dough ball into a large, oiled bowl. Cover the bowl with plastic wrap and let the dough rise in a warm place for about 45 minutes, or until it has doubled in volume. Do not punch down the dough.
  4. Lightly oil a 15x10x1 inch baking sheet. Slide the dough out of the bowl and onto the baking sheet. Gently pull and stretch the dough until it covers most of the baking sheet. Do not knead or punch down the dough. 
  5. Press your fingertips on the top of the dough to form pretty and "rustic" indentations. Brush the top of the dough with olive oil or another oil of your choice. We like using basil oil.
  6. Cover the top of the pan with plastic wrap and let it rise in a warm place for about 15 minutes, or until the dough is puffed up. 
  7. Preheat the oven to 450. Bake the bread (on the middle rack in the center of your oven) until it is a deep, golden brown, or about 30 minutes. 
  8. Let it cool, and then eat it!
____________________

Enjoy your bread,
Katie

Tuesday, July 29, 2014

Monster Cookies

Rawr!


Why are Monster Cookies named, well, Monster Cookies? Why are they not named Elf Cookies, or better yet, Unicorn Cookies? Why the "Monster" in "Monster Cookie"?

Instead of doing the sensible thing and searching the internet for an answer, I have come up with several reasonable hypothesises (hypothi, hypothesis'?) Either:

A. Monsters do not like these cookies.
OR
B. Monsters are attracted to these cookies.

Based on these, I have made several possible scientific conclusions:

A. These cookies were once used to ward off unwanted monsters.
B. These cookies were once used to attract the monsters away from under the bed, in the closet, etc.
C. The ingredients in the cookies were from the Forest of Closet Monsters.

______________________________

MONSTER COOKIES RECIPE


WHAT YOU NEED:
  • 1 stick margarine (not shown)
  • 1 1/2 cup peanut butter
  • 1 cup sugar
  • 1 1/3 cup brown sugar
  • 3 eggs
  • 1 tsp. vanilla
  • 2 tsp. baking soda
  • 1/2 tsp. salt
  • 4 1/2 quick oatmeal
  • 3/4 cup mini chocolate chips
  • 1/2 cup M and M's

HOW TO MAKE THEM:
  1. Cream the margarine, peanut butter and sugars.
  2. Add the eggs, vanilla, baking soda, and salt.
  3. Pour in the oatmeal as the mixer is running.
  4. Add the chocolate chips and the M and M's. Do not over mix, or else your M and M's will break. If needed, hand mix with a wooden spoon.
  5. Bake the cookies at 350 F. for about 12 minutes.
  6. Try to let them cool before devouring them.

Note: This recipe makes about four dozen cookies. This may seem like a lot of cookies, but whether you use them to ward off monsters (see Hypothesis A) or lure them closer (see Hypothesis B), you will probably need a whole bunch of them!
______________________________

Your trusted monster "expert",
Katie

Tuesday, July 15, 2014

Popcorn in a Paper Bag

Let's face it. Paper bags are boring. Popcorn kernels are, well...popcorn kernels are pretty boring, too. However, do you know what happens when you put two boring things together?


You can make popcorn!

Note: You cannot always put two boring things together and make popcorn. For example, if you put paint (that's drying) on grass (that's growing), you wouldn't get popcorn.

You would get nasty grass.

____________________

POPCORN IN A PAPER BAG


WHAT YOU NEED:
  • 1/4 cup popcorn (any kind)
  • 1 Tbsp. olive oil
  • A pinch of salt

SUPPLIES:
  • Paper bag
  • Tape

HOW TO MAKE IT:
  1. Pour the popcorn, salt, and olive oil into the bag.
  2. Fold the top of the bag down and tape it.
  3. Put it in the microwave for about 2 minutes, or until you hear five seconds between pops.
  4. Put the popcorn in another bowl or, if you don't want to wash another dish, you can eat it right out of the bag. (The bag might be a little bit oily.)
  5. Eat it!

Note: Do not reuse the paper bag to make another batch of popcorn.
____________________

Happy snacking!
Katie

Saturday, June 28, 2014

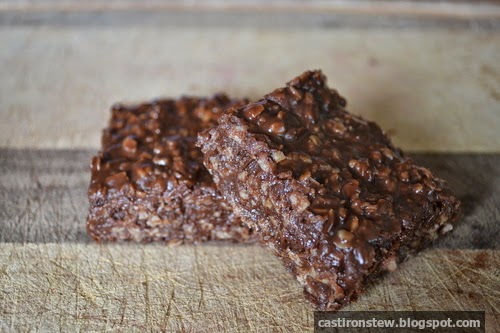
No-bake Cookies

Cookies!

Chocolate cookies!

Delicious, chocolate cookies!


As I am writing this, I have a fresh batch of succulent no-bake cookies waiting for me on my counter top. I'll admit, I want to take a spoon straight to the pan.

But, I will not. I will be kind and generous and share with my family.

If you want to have a delicious batch of chocolate no-bake cookies sitting on your counter top, I have a recipe that you just might love:

____________________

NO-BAKE COOKIES


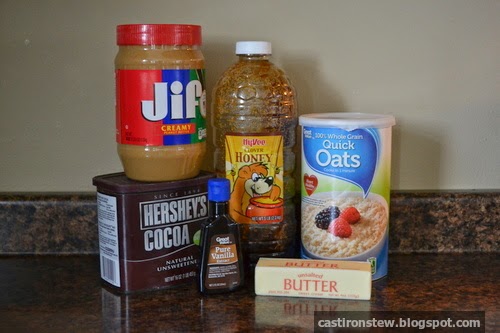
WHAT YOU NEED:
  • 1 cup peanut butter
  • 1/2 cup butter (1 stick)
  • 3/4 cup honey
  • 6 Tbsp. cocoa powder
  • 2 1/2 cups quick oats
  • 1 tsp. vanilla


SUPPLIES:
  • Measuring cups
  • Sauce pan (3 quart)
  • Wooden stirring spoon
  • Cookie sheet (or a 9" x 9" pan)
  • Plastic wrap


HOW TO MAKE IT:
  1. Line the pan with plastic wrap.
  2. Add the peanut butter, plain ol' butter, and honey to the sauce pan, over low heat. Once the peanut butter is creamy smooth and butter is melted, turn off the heat.
  3. Mix in the cocoa powder and then take a big whiff of the chocolaty goodness. 
  4. Add the quick oats and vanilla.
  5. Using the wooden spoon, drop batter into small servings (or, for a more technical term, blobs) on the cookie sheet. Or, if you are messy and clumsy like I am, you can just pour the whole batch into a pan. 
  6. Lick the spoon.
  7. Let the batter sit until it is firm. I know this is hard, but you can do it! 
  8. Enjoy! (Remember to share.)

Warning: don't give honey to kids under 1 year of age. I know that you might be imagining their cute little faces looking up at you as their little begging eyes seem to say "Pweeeeeese? Just a wittle honey?" But don't give in! NEVER! Unless they are over one year of age. Then it's ok.

Recipe adapted from The Frugal Farm Wife.
____________________

Thanks for reading,
Katie